")
Garage doors might seem like simple barriers to protect your car or tools, but there’s actually much more to them. They’re like the unsung heroes of your home, keeping your stuff safe, improving your home’s looks, and making sure your family stays warm or cool, depending on the season. Whether you’re familiar with terms like modern garage doors or insulated garage doors, or you’re here to learn the ins and outs, we’re jumping into everything you need to know about garage doors in a fun and easy way.
What Exactly is a Garage Door?
Picture a giant wall that basically opens and closes on command. That’s your garage door! But it does more than that. It’s a mix of strength, security, and style. Whether you’re thinking of snagging a glass garage door for your home’s aesthetic buzz or a reliable roll-up garage door for your workshop, garage doors are all about blending function and fashion.
But hey, it’s not just about what you see. Behind the scenes, they’re made up of several moving pieces, often referred to as garage door components. Together, these parts work like a perfectly rehearsed dance. For example, the garage door springs give it the oomph to open, and sensors stop the door from crushing your precious pet goldfish tank.
Fun fact? There are even garage doors with windows or fancy ones decked out with garage door window inserts if you’re fancy like that. Windows on garage doors bring natural light in and brighten up your space (while still looking extra cool).
Types of Garage Doors
Ah, the many faces of garage doors! If you’re trying to find “the one,” the first thing to think about is function and style. Here are the main types of garage doors you’ll come across.
1. Sectional Garage Doors
Most homes have these. Installed as multiple panels, they bend and flex open overhead. They’re smooth, they’re reliable, and with a garage door bottom seal, they can even fight off pesky winter drafts!
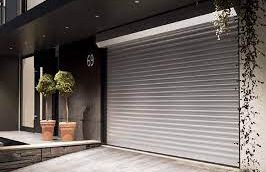
2. Roll-Up Garage Doors
For those tight spaces or industrial looks, roll-up garage doors are king. They’re neat, simple, and, honestly, pretty satisfying to watch as they curl up like a cinnamon roll.
3. Carriage Garage Doors
Hello, vintage vibes! When you see a black garage door with side hinges like a barn door, you’re likely looking at a carriage-style garage door. They’re classy, durable, and perfect if you want your home to stand out.
4. Modern Garage Doors
Ah, the true show-offs. These doors scream “trendsetter” with designs like glass garage doors or sleek black garage doors. They pair well with chic homes and look especially swanky at sunset.
5. Tilt-Up and Folding Garage Doors
These are single-piece doors that tilt open. They’re straightforward and excellent for sheds or older homes.
Got a two-car garage? A 2-car garage door is probably in the cards. These provide wide, uninterrupted spaces for parking and entry. And fun trivia? The most popular standard garage sizes include dimensions like a 16×7 garage door.
The Magic of Opener Systems
What’s a garage door without its trusty remote? Practically a fence with attitude. Enter the world of garage door openers.
1. Craftsman Garage Door Openers
Known for reliability, the Craftsman garage door opener is a solid choice if you want a user-friendly device that lasts for years.
2. Linear Garage Door Opener
When sleek design meets dependable performance, you’re likely looking at a linear garage door opener. This opener plays nicely with modern smart home systems, too.
3. Wall Mount Garage Door Opener
Running out of ceiling space? Woohoo! The wall mount garage door opener is here to save the day by keeping stuff sleek and out of the way.
4. Genie Brand Garage Door Openers
Behold, the veterans of the garage world. Genie brand garage door openers provide durability, reliability, and zero stress.
And because we’re all about solutions, universal garage door remotes make life easier if your original remote gets lost in a junk drawer (no judgment).
All Those Handy Garage Door Accessories
A garage door isn’t just a door. It’s the entire experience. Deck it out with accessories like garage door screens for added ventilation or keep things snug with a proper garage door gasket. Did you know that a simple garage door seal bottom upgrade could also knock down energy bills? Yup, sealing the bottom of your garage door prevents air leaks and keeps your car cozy.
But wait, there’s more! If you’re into multitasking, garage doors can be paired with garage screen doors for outdoor enthusiasts who want fresh air but no bugs.
Heard about smart upgrades? Fancy stuff like security-connected garage door sensors protects you from accidents and even burglars.
Common Garage Door Problems
Even top-tier doors sometimes hiccup. Whether it’s wear and tear or too many weekend DIY experiments gone wrong, here’s how much you should know about repairs.
- Garage Door Spring Replacement Cost
Your garage door springs do the heavy lifting (literally). If they snap, no worries; the garage door spring replacement cost isn’t going to sink your finances. - Garage Door Off-Track Issues
If your door somehow goes rogue and gets stuck, you’ll need immediate diagnosis to fix a garage door on track problem. - Fix Garage Door Paint
Scratches? Peeling color? A little garage door paint goes a long way in revamping its curb appeal.
Whether it’s a garage door panel replacement or redoing a creaky garage door hinge, you’ve got a solution for it all.
What Makes the Perfect Garage Door?
Stop. Yes, you! Think about your ideal garage door. Are you picturing wood garage doors that feel warm and rustic, or are you imagining chi garage doors with advanced insulation? Maybe you want to combine functionality with art and go for a garage door with windows, or possibly something smoother like a garage door with a door.
Whatever the choice, always look at durability, style, and practicality. For example, insulated garage doors are superheroes in extreme temperatures, making sure your energy bills don’t spike unnecessarily.
And never forget to double-check sizing! If you need help sorting through standard garage door sizes, consider common options like 16×7 garage doors. These sizes fit most residential garages like a glove.
The Secret Sauce
The perfect garage door is all about balance. It’s part aesthetic, part function, and all you! Keep your garage insulated, stylish, and tech-savvy with key upgrades–from garage door seals to a remote control garage door opener.
Trust us, finding the perfect garage door is like discovering your favorite song on a road trip. It seals the deal (literally). And yes, pun proudly intended.
Are you ready to make your garage door the talk of the town? Maintenance, your compact garage door will provide years of reliable service.