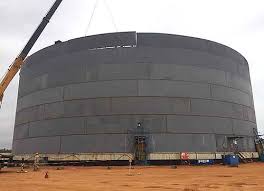
Constructing a water tank is a meticulous process that involves several crucial steps to ensure durability, efficiency, and long-term functionality. In this article, we will outline the essential steps in water tank construction, from laying the foundation to completing the finishing touches.
Site Selection and Preparation:
The first step in water tank construction is selecting an appropriate site. Factors such as elevation, accessibility, and proximity to water sources should considered. Once the site is chosen, proper preparation is essential. This involves clearing the area of vegetation, leveling the ground, and ensuring adequate drainage to prevent water accumulation around the tank.
Foundation Construction:
A solid foundation is critical for the stability and longevity of the water tank. Depending on the size and type of tank, foundations may include reinforced concrete slabs or footings. Engineers carefully design the foundation to distribute the tank’s weight evenly and account for factors such as soil composition and seismic conditions.
Anchor Bolt Installation:
Anchor bolts are embedded into the foundation to secure the tank. These bolts extend vertically and are strategically placed to match the tank’s anchor points. Proper alignment and spacing are crucial to ensure the tank is securely fastened to the foundation, preventing movement or tilting.
Tank Shell Assembly:
The tank shell, typically made of steel panels, assemble on-site. The panels joined using bolts or welded seams, forming a cylindrical structure. Careful attention given to alignment and levelness during this process to ensure the integrity of the tank. The choice between bolted and welded construction depends on factors such as tank size, location, and project specifications.
Roof Construction:
The type of roof depends on the tank’s purpose and environmental considerations. Common roof styles include cone roofs, dome roofs, or flat roofs. Roof construction involves the installation of rafters, purlins, and roofing materials. Proper sealing and insulation are essential to prevent water contamination and minimize evaporation.
Fittings and Appurtenances Installation:
Various fittings and appurtenances, such as inlet and outlet pipes, overflow pipes, vents, and access hatches, installed according to the tank’s design specifications. Care taken to ensure watertight connections and safety features such as ladders or stairs are incorporate for maintenance purposes.
Coating Application:
To protect the tank from corrosion, a protective coating applied to both the interior and exterior surfaces. Common coatings include epoxy, galvanized coatings, or specialized coatings based on the tank’s intended use. The coating process requires precision to ensure uniform coverage and adherence to industry standards.
Leak Testing and Quality Control:
Before putting the water tank into service, thorough leak testing is conducted. This may involve filling the tank with water and monitoring for any signs of leakage. Quality control measures are implemented throughout the construction process, including weld inspections, coating integrity checks, and overall structural assessments.
Final Inspection and Certification:
Once construction is complete and all quality checks are passed, a final inspection is conducted. This inspection ensures that the tank meets industry standards, local regulations, and project specifications. If the tank complies with all requirements, it is certified for use.
Commissioning and Handover:
The final step involves commissioning the water tank for use. This includes flushing the tank, disinfecting the water, and putting it into service. After successful commissioning, the complete water tank is officially hand over to the end-user.
In conclusion
Constructing a water tank involves a series of carefully orchestrated steps, from site selection to commissioning. Each phase requires expertise, precision, and adherence to industry standards to ensure the tank’s reliability and longevity in providing a safe and secure water supply.

