")
Adding a bathroom to your garage can be a convenient and practical addition to your home. However, it’s important to make sure that the plumbing is properly installed to prevent any leaks or other issues. Here are some tips on how to install plumbing for a garage bathroom:
Determine the Location
The first step in installing a garage bathroom is to determine the location. You’ll want to choose a location that is close to the existing plumbing and easy to access. Keep in mind that you’ll need to install drain pipes, water supply lines, and ventilation. It’s also important to check with your local building codes to make sure that the location you’ve chosen approve for plumbing installation.
Install Drain Pipes
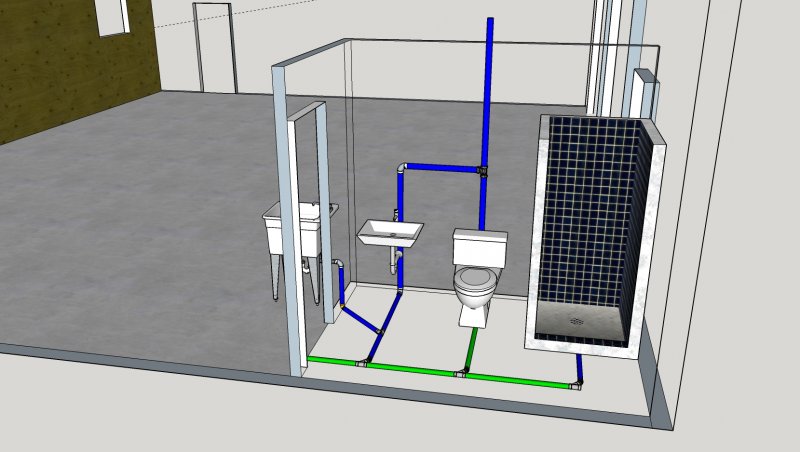
Once you’ve determined the location, the next step is to install drain pipes. You’ll need to connect the drain pipes to the existing plumbing in your home or run new pipes if necessary. The drain pipes should be slop slightly downward to allow for proper drainage. It’s important to use the correct size and type of pipes for your specific situation. PVC pipes commonly use for drain pipes.
Install Water Supply Lines
After the drain pipes are install, you’ll need to install water supply lines. The water supply lines should be connect to the existing plumbing in your home or run new lines if necessary. Copper pipes commonly use for water supply lines, but PEX and CPVC are also options. It’s important to use the correct size and type of pipes for your specific situation.
Install Ventilation
Proper ventilation is important to prevent mold, mildew, and other issues in your garage bathroom. You’ll need to install a ventilation system that includes a vent fan and vent ducts. The vent fan should installed in the ceiling of the bathroom and connected to the vent ducts that run to the exterior of your home. It’s important to make sure that the vent ducts are properly insulate to prevent condensation.
Install Fixtures
Once the plumbing is installed, you’ll need to install the fixtures such as the sink, toilet, and shower or bathtub. Make sure to choose fixtures that are appropriate for your space and budget. It’s important to follow the manufacturer’s instructions for installation and to use the correct plumbing connections.
Test the Plumbing
After the plumbing is installed, it’s important to test it to make sure that there are no leaks or other issues. Turn on the water supply and check for any leaks in the drain pipes, water supply lines, and fixtures. It’s important to address any issues immediately to prevent damage to your garage and home.
Obtain Permits
Before you start any plumbing work, it’s important to obtain the necessary permits from your local building department. This will ensure that your plumbing installation meets the local building codes and regulations.
Hiring a Professional
Plumbing installation can be a complex and challenging task, especially if you have no prior experience. It’s always a good idea to hire a professional plumber to install the plumbing for your garage bathroom. A professional plumber can ensure that the plumbing is installed correctly and safely, and can help you avoid costly mistakes.
In summary, installing plumbing for a garage bathroom requires careful planning, proper installation, and regular maintenance. By following these tips, you can ensure that your garage bathroom plumbing is installed correctly and safely, and that it meets the local building codes and regulations. If you’re unsure about any aspect of the plumbing installation, it’s always a good idea to hire a professional plumber to assist you.