")
Introduction:
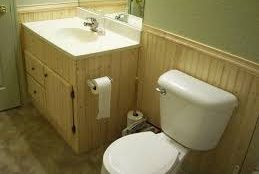
Green beadboard is a popular choice for adding a touch of charm and character to bathroom walls. This type of paneling offers a classic and timeless look while also providing a durable and moisture-resistant surface. If you’re considering installing green beadboard in your bathroom, this ultimate guide will walk you through the step-by-step process, helping you achieve a beautiful and functional result.
Step 1: Measure and Plan:
Before starting the installation, carefully measure the dimensions of your bathroom walls to determine the amount of beadboard needed. Consider any obstacles such as windows, doors, or fixtures and plan how the beadboard will be positioned around them. Create a detailed layout and make note of any necessary cuts or adjustments.
Step 2: Gather Materials and Tools:
Collect all the materials and tools required for the installation. This includes green beadboard panels, adhesive or nails, a level, a tape measure, a saw or jigsaw for cutting, a caulk gun, construction adhesive, a nail gun (if using nails), a putty knife, sandpaper, and paint (if desired for finishing touches).
Step 3: Prepare the Walls:
Ensure that the walls are clean, dry, and free from any existing wallpaper or paint. Remove any fixtures, such as towel bars or electrical outlet covers, that may hinder the installation. Repair any holes or uneven areas on the walls and sand them smooth for a better adhesive bond.
Step 4: Cut the Beadboard:
Using the measurements and layout plan, cut the green beadboard panels to the appropriate sizes. Measure carefully and mark the panels before making any cuts. Use a saw or jigsaw to achieve precise cuts. Remember to account for any cutouts needed for fixtures or openings in the wall.
Step 5: Install the First Panel:
Begin the installation by applying a bead of construction adhesive vertically along the back of the first beadboard panel. Alternatively, you can use a nail gun to secure the panel to the wall. Align the panel with the desired starting point and press it firmly against the wall, ensuring it is level. If using nails, place them near the edges of the panel where they will be covered by the panel’s molding.
Step 6: Install Subsequent Panels:
Continue installing the remaining green beadboard panels, applying adhesive or using nails as previously described. Fit each panel snugly against the previous one, checking for levelness and alignment. Use a level periodically to ensure that the panels are installed straight.
Step 7: Trim and Finishing Touches:
Once all the beadboard panels are installed, it’s time to add trim and complete the finishing touches. Measure and cut the trim pieces to fit along the edges of the panels and any corners or transitions. Use adhesive or nails to secure the trim in place. Fill any gaps or nail holes with caulk or putty, and sand the surfaces smooth.
Step 8: Paint or Seal:
If desired, you can paint the green beadboard to achieve a specific color or finish. Choose a paint specifically formulated for bathroom use and follow the manufacturer’s instructions. Apply multiple coats as necessary, allowing sufficient drying time between coats. Alternatively, you can seal the beadboard with a clear protective finish to retain its natural color and texture.
Step 9: Reinstall Fixtures:
Once the paint or sealant is dry, reattach any fixtures that were temporarily removed, such as towel bars or electrical outlet covers. Ensure they are securely fastened and aligned with the beadboard.
Step 10: Clean and Maintain: After the installation is complete, clean the green beadboard with a gentle cleanser and a soft cloth. Avoid using abrasive cleaners or scrub brushes that could damage the surface. Regularly inspect the beadboard for any signs of damage or wear and address any issues promptly to maintain its appearance and functionality.
Conclusion:
Installing green beadboard in your bathroom can transform the space, adding a touch of elegance and charm. By following this ultimate guide, you can successfully install green beadboard and create a visually appealing and durable wall surface. Remember to measure and plan, gather the necessary materials and tools, prepare the walls, cut the beadboard, install the panels, add trim and finishing touches, paint or seal as desired, reinstall fixtures, and maintain the beadboard’s cleanliness and condition. Enjoy the timeless beauty and functionality of your newly installed green beadboard bathroom walls.