")
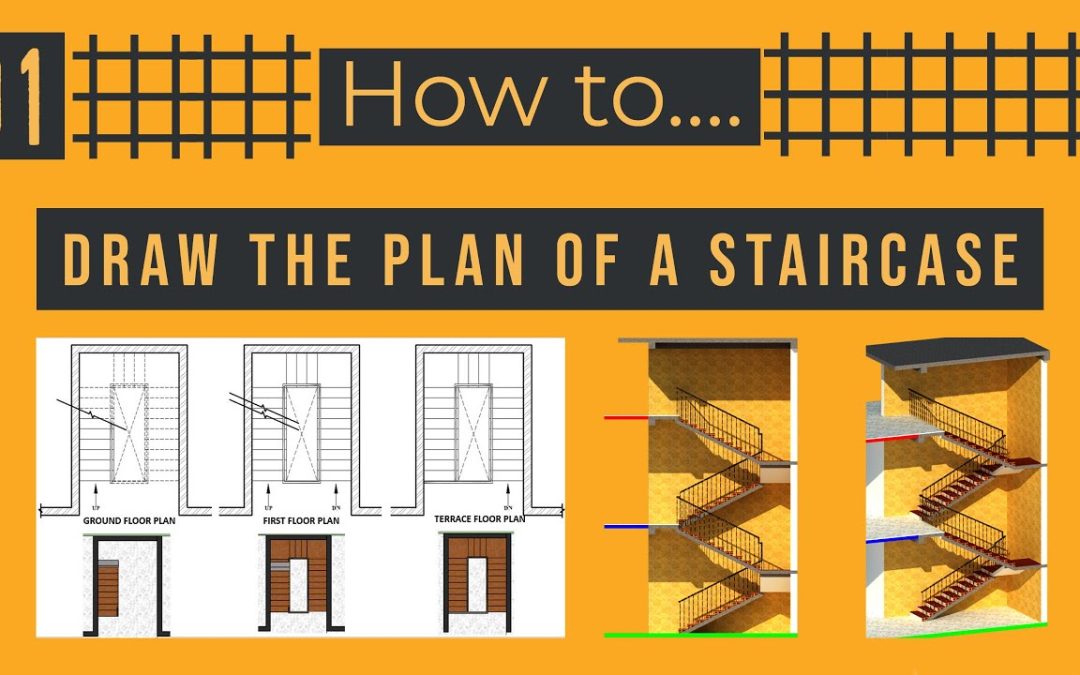
Drawing stairs on a floor plan can be challenging, especially if you are not familiar with the standard practices and conventions used in architectural drafting. In this article, we will discuss how to draw stairs on a floor plan step by step.
Step 1: Determine the Stair Location
The first step in drawing stairs on a floor plan is to determine the location of the stairs. Stairs should be placed in a convenient and easily accessible location, typically near the entry or main living area. Consider the flow of traffic in the space and ensure that the stairs do not obstruct any important features or functions of the room.
Step 2: Determine the Stair Type
The next step is to determine the type of stairs that will be used. There are several types of stairs commonly used in residential and commercial construction, including straight-run stairs, L-shaped stairs, U-shaped stairs, and spiral stairs. The type of stairs will depend on the available space, building code requirements, and the desired aesthetic.
Step 3: Determine the Stair
Dimensions Once you have determined the location and type of stair, you will need to determine the dimensions of the stair. The dimensions of the stair will depend on the height of the floor to floor, the rise and run of the steps, and the headroom clearance required by building codes.
To determine the rise and run of the steps, use the following formula:
Rise = floor-to-floor height/number of risers Run = total run/number of treads
The headroom clearance required by building codes is typically 6 feet 8 inches, but may vary depending on local regulations.
Step 4: Draw the Stairwell Opening
Next, draw the stairwell opening on the floor plan. The stairwell opening should be a rectangle with the same dimensions as the stairwell. The size and location of the opening will depend on the size and location of the stairwell.
Step 5: Draw the Stair Stringers
The stair stringers are the structural supports that run along each side of the stairway and support the treads and risers. Draw the stringers on the floor plan, ensuring that they are the correct size and located in the correct position.
Step 6: Draw the Treads and Risers
The treads are the horizontal surfaces of the stairs that the foot lands on, while the risers are the vertical surfaces that connect the treads. Draw the treads and risers on the floor plan, ensuring that they are the correct size and spaced properly.
Step 7: Draw the Handrail and Balusters
The handrail and balusters provide safety and support while ascending and descending the stairs. Draw the handrail and balusters on the floor plan, ensuring that they are the correct size and located in the correct position.
Step 8: Label the Stairs
Label the stairs on the floor plan, indicating the direction of travel and any other relevant information. Such as the number of treads or the type of stair.
Step 9: Check Building Codes and Regulations
Finally, before finalizing the stair design on the floor plan, check building codes and regulations to ensure .That the design meets the required standards for safety and accessibility.
In conclusion, drawing stairs on a floor plan requires careful planning and attention to detail. By following these steps and considering the location, type, dimensions, and building codes, you can create a safe and functional stair design that fits seamlessly into the overall design of the space.how to draw stairs on a floor plan