")
Epoxy resin is a versatile material that is used in a wide range of applications such as coating, casting, and laminating. It is a popular choice for creating art pieces, jewelry, and other decorative objects. However, one of the common problems that can occur while working with epoxy resin is the appearance of dimples or bubbles. These dimples can ruin the smooth finish of your project and can be frustrating to deal with. Fortunately, there are ways to fix dimples in epoxy resin. In this article, we will discuss some tips and techniques to help you fix dimples in epoxy resin.
What causes dimples in epoxy resin?
Before we dive into how to fix dimples in epoxy resin, it is important to understand what causes them in the first place. Dimples or bubbles in epoxy resin can occur due to various reasons such as:
Mixing: Improper mixing of the epoxy resin can result in bubbles forming in the mixture. It is important to follow the instructions provided by the manufacturer and mix the resin and hardener thoroughly.
Air trapped in the mixture: Air can get trapped in the mixture while mixing, pouring, or spreading the epoxy resin. This can result in bubbles forming in the resin.
Temperature: Temperature plays a crucial role in the curing process of epoxy resin. If the temperature is too cold or too hot, it can affect the curing process and result in dimples or bubbles forming in the resin.
Humidity: High humidity can also affect the curing process of epoxy resin and result in dimples or bubbles forming in the resin.
Now that we know the causes of dimples in epoxy resin, let’s look at some tips and techniques to fix them.
Techniques to fix dimples in epoxy resin
Use a heat gun or torch: One of the easiest ways to fix dimples or bubbles in epoxy resin is by using a heat gun or a torch. Hold the heat gun or torch about 4-5 inches away from the surface of the resin and move it back and forth in a sweeping motion. This will help to pop the bubbles and remove any dimples in the surface. However, be careful not to overheat the resin as it can cause the resin to discolor or even burn.
Use a toothpick or a needle: Another technique to fix dimples in epoxy resin is by using a toothpick or a needle. Gently poke the surface of the resin with the toothpick or needle and drag it across the surface. This will help to release any trapped air and remove any bubbles or dimples in the resin. However, be careful not to apply too much pressure as it can scratch the surface of the resin.
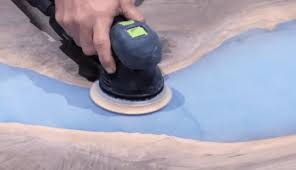
Sanding: If the dimples are too deep or the surface is uneven, you can use sandpaper to smooth out the surface. Start with a coarse sandpaper and gradually move to a finer grit sandpaper. Be careful not to sand too much as it can damage the surface of the resin.
Pour another layer: If the dimples are too deep or the surface is too uneven, you can pour another layer of epoxy resin over the surface. This will help to fill in any gaps and create a smooth surface. However, be sure to wait for the first layer to cure completely before pouring the second layer.
Tips to prevent dimples in epoxy resin
Prevention is always better than cure. Here are some tips to help prevent dimples in epoxy resin:
Mix the epoxy resin and hardener thoroughly and follow the instructions provided by the manufacturer.
Pour the mixture slowly and spread it evenly using a spatula.
Use a degassing chamber to remove any trapped air from the epoxy resin mixture before pouring it into your project. This will help to reduce the number of air bubbles in the mixture.
Use a heat gun or torch to remove any bubbles that form in the surface of the epoxy resin after pouring. This will help to prevent dimples from forming as the resin cures.
Make sure the temperature and humidity levels in the room are within the recommended range for curing epoxy resin.
Use a sealing agent on porous surfaces before applying epoxy resin. This will help to prevent air from getting trapped in the surface and causing bubbles to form.
Work in a clean and dust-free environment. Dust and debris can get trapped in the epoxy resin and cause bubbles to form.
In conclusion, fixing dimples in the epoxy resin can be a frustrating process, but there are techniques and tips that can help you achieve a smooth and flawless finish. Use a heat gun or torch, toothpick or needle, sandpaper, or pour another layer of epoxy resin to fix dimples. To prevent dimples from forming, follow the instructions provided by the manufacturer, use a degassing chamber, apply epoxy resin slowly and evenly, work in a clean and dust-free environment, and make sure the temperature and humidity levels are within the recommended range for curing epoxy resin. With these tips and techniques, you can create beautiful and flawless epoxy resin projects.