")
Clapboard, also known as bevel or lap siding, is a traditional type of exterior siding made from wood, fiber cement, or vinyl. It is installed horizontally on the exterior of homes and buildings and provides a classic, timeless look. In this article, we will provide a step-by-step guide on how to install clapboard siding.
Step 1: Gather Materials and Tools
Before starting any siding project, it is important to gather all the necessary materials and tools. For clapboard siding installation, you will need:
Clapboard siding
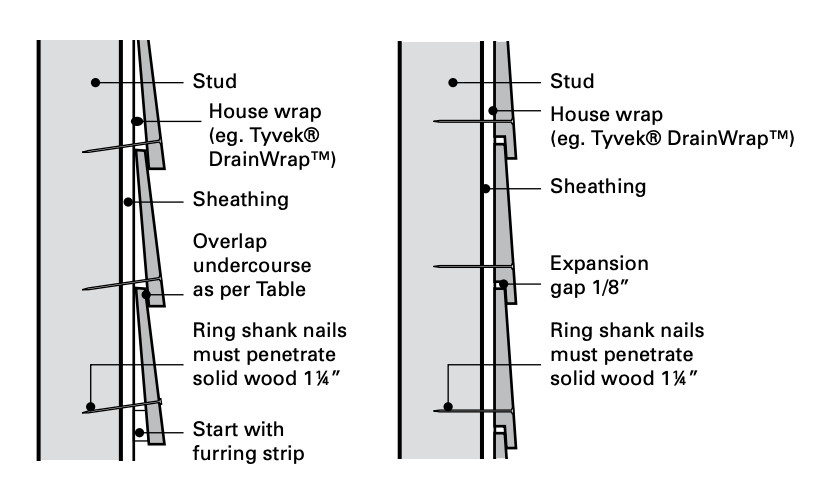
House wrap
Nails
J-channel or corner trim
Flashing
Caulk
Utility knife
Tape measure
Chalk line
Hammer or nail gun
Circular saw or jigsaw
Ladder
Safety glasses and gloves
Step 2: Prepare the Exterior Wall
To prepare the exterior wall for clapboard siding installation, remove any existing siding, trim, or other obstructions. Ensure that the wall is flat, smooth, and free of any debris. Install house wrap over the wall to provide a moisture barrier and improve energy efficiency.
Step 3: Install J-Channel or Corner
Trim Install J-channel or corner trim along the corners and edges of the exterior wall to provide a clean, finished look. Nail the J-channel or corner trim into place, ensuring that it is level and plumb.
Step 4: Measure and Cut the Clapboard Siding
Measure the length of the wall to determine the length of the clapboard siding needed. Add an extra inch or two to allow for the expansion and contraction of the wood. Cut the clapboard siding to the appropriate length using a circular saw or jigsaw.
Step 5: Install Flashing
Before installing the clapboard siding, install flashing over any protrusions, such as windows, doors, or vents. Flashing provides an extra layer of protection against water damage and helps to direct water away from the house.
Step 6: Install the First Row of Clapboard Siding
Start at the bottom of the wall and install the first row of clapboard siding. Use a chalk line to ensure that the siding is level, and nail it into place using nails or a nail gun. Be sure to leave a small gap between each piece of siding to allow for the expansion and contraction of the wood.
Step 7: Install the Second Row of Clapboard Siding
Install the second row of clapboard siding, overlapping the first row by 1-2 inches. Nail it into place, ensuring that it is level and plumb. Continue installing additional rows of clapboard siding until the entire wall is covered.
Step 8: Install Corner Posts
Install corner posts at the corners of the exterior wall to provide additional support and stability. Nail the corner posts into place, ensuring that they are level and plumb.
Step 9: Cut Siding for Windows and Doors
Measure and cut clapboard siding to fit around windows and doors. Install the siding using the same process as the rest of the wall, ensuring that it is level and plumb.
Step 10: Caulk and Paint
Once the clapboard siding is installed, use caulk to seal any gaps or cracks around windows, doors, or other protrusions. Allow the caulk to dry completely, then paint the clapboard siding to protect it from the elements and give it a finished look.
In conclusion, installing clapboard siding can be a great way to give your home or building a classic, timeless look. By following these simple steps, you can install clapboard siding and ensure that it is level, plumb, and properly sealed. Remember to take the necessary safety precautions, and if you are unsure about any aspect of the project, consult with a professional contractor or builder. With the right tools and materials, and a little bit of patience, you can install clapboard siding and enhance the curb appeal of your home or building.