")
When you hear the term “metal roofs,” you might think about those sleek, shiny coverings that you see on modern houses or maybe even rustic barns. But metal roofs are so much more than just a pretty surface! They’re crafted from durable materials that are designed to last, protect your home, and even offer benefits you might not have thought about.
The types of metal roofs include materials like steel, aluminum, copper, and zinc. These materials each have their own perks. For instance, steel is super strong and often coated to prevent rust. Aluminum is light but highly resistant to corrosion, making it a great choice for places near the ocean. Copper and zinc? They’re the fancy ones, often chosen for their premium look and longevity.
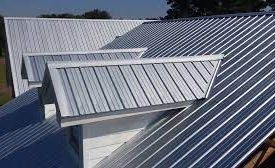
One popular style you’ve probably seen is the standing seam metal roof. This design features raised seams that lock panels together, ensuring water stays out and giving it that clean, polished look we all secretly love. If you’ve been eyeing those roofs that look like tiles or even shingles, you might be looking at a metal shingle roof, which neatly combines durability with classic charm.
And don’t worry about colors being boring. Metal roof colors are practically endless! Whether you want bold shades like green or black metal roofing or understated classics like white metal roofs, there’s something to suit every home. Options like galvalume metal roofing provide a modern, silvery appearance, while coatings can add pops of personality or mimic traditional options like stone-coated metal roofing.
But here’s the catch—not all metal roofs are created equal. Choosing the best fit depends on your home’s style, the climate where you live, and how much effort you want to spend maintaining it. Thankfully, the variety of types of metal roofing materials means you’ve got plenty to pick from.
Understanding Asphalt Shingles
Now, what about shingles? If metal roofs are the sleek and modern sprinters, asphalt shingles are the dependable marathon runners. These are the most common roofing materials in America, and for good reason. They get the job done.
Shingles are made from a combination of asphalt, a fiberglass base, and ceramic granules. Yes, they sound a bit like a science experiment, but they’re crafted to withstand the elements. While they might not be as fancy as a standing seam metal roof, they offer a rugged charm that’s hard to ignore.
One cool thing about shingles is their versatility. You’ve got two main types to choose from. First, you’ve got the standard three-tab shingles. These are the budget-friendly options that perform well without breaking the bank. Then there are architectural shingles, which are thicker and have a more textured look, adding a bit of flair to your roof.
And don’t overlook their beauty! Shingles aren’t just flat and gray anymore. They come in all sorts of colors and styles to match the look of your home. Whether you’re into earthy tones or bold terracotta vibes, it’s fairly easy to find an option that fits your style.
Comparing Their Build and Practicality
When we compare metal roofing and shingles, one thing becomes obvious quickly. Metal roofing is the flashy athlete with endless stamina, while shingles are the dependable team player who shows up every day, rain or shine.
Take durability, for example. Metal roofs can last 40 to 70 years or more. Yup, you read that right. How long do metal roofs last? A lifetime for many folks! Meanwhile, shingles usually need replacement every 20 to 30 years. It might not be a big deal initially, but over time, replacing shingles can add up to a hefty cost.
If you live in an area with heavy snow, metal roofs again race to the top. The slick surface helps snow slide right off, especially if you add metal roof snow guards to keep it from piling up in inconvenient places. Shingles, on the other hand, tend to hold onto the snow like a clingy ex, which can lead to leaks or even structural issues. That’s why homes in snowy regions often go for metal roofs with snow guards for added protection.
Now here’s a fun tidbit you might not know. Metal roof screws and panels are designed to lock tightly together, creating a nearly impenetrable surface. Plus, metal roof flashing makes sure water doesn’t sneak in at the edges or around chimneys. This means way less worry about water damage. Roofing screws for metal roofs, paired with the right sealing techniques, make sure everything stays in its rightful place, even during storms.
A Note on Costs
Here’s where we spill the tea about money. Metal roofing is pricier upfront. That’s not really a secret. The cost of a metal roof varies, starting around $10,000 and going up depending on the size and material. For instance, standing seam metal roofing costs a bit more because of the premium materials and labor required. Budget options like r panel metal roofs or metal roll roofing offer simpler installations, but they don’t have the same sleek look as more elaborate types.
On the flip side, shingles are a friend to your wallet in the short term. You might pay $5,000 to $10,000 for an asphalt roof, making it easy to stick to your budget. But the real question is, are you willing to deal with repairs and replacements every couple of decades?
If you’re watching your wallet closely, look into tools like a metal roof cost calculator or online guides to metal roofing prices to weigh the initial cost of metal roof versus shingles against the long-term savings in maintenance.
The Colorful World of Roofing
One area that might not cross your mind as much is color. Choosing the perfect metal roof paint or metal roofing colors actually impacts more than just the look of your home. Light colors like white or pale gray reflect sunlight, which can keep your house cooler. Bold, dark options like black or green can add drama but may absorb more heat.
Can you switch things up later? You betcha! A repainting of a metal roof process is 100% possible. Can you paint a metal roof a different color down the road? Absolutely, and it can be a fun way to boost your curb appeal without replacing the whole thing. Shingles can’t always say the same—but hey, nobody’s perfect.
Metal Roofs for All Scenarios
Metal roofs really shine when it comes to adaptability. Whether it’s a rustic barn look or a sleek modern vibe, they can do it all. Options like aluminum metal roofing are lightweight and won’t rust, making them ideal for wet climates, while stone-coated metal roofing mimics the charm of traditional tiles with all the durability of metal.
Wanting something lower-maintenance? Many metal roofs have special coatings, like metal roof coating, that make them resistant to rust and wear. You’ll save on metal roof repair costs down the line. Plus, these coatings can be eco-friendly and extend the lifespan of the roof even further.
And Shingles Aren’t Far Behind
Shingles, though, shouldn’t be underestimated. Simpler to install and easier to repair, shingles are the pick for homeowners who just want an affordable, straightforward option. Got a few damaged pieces? No problem. Replace them without needing to call in a team of experts.
Plus, they’re widely available at retailers like Menards metal roofing and other home improvement stores, which makes quick fixes easier.
The Final Verdict
At the end of the day, the choice between metal roofs and shingles comes down to what you need, where you live, and, of course, your budget. Each has its strengths and quirks, but the best part is, there’s no wrong answer. If you’re looking for a high-performing, long-lasting covering, metal might be calling your name. Prefer something reliable and budget-friendly? Shingles have your back.