")
WPC (wood plastic composite) doors are becoming an increasingly popular choice for bathroom doors because they are durable, moisture-resistant, and low-maintenance. Installing WPC bathroom doors is a straightforward process that can be completed in just a few hours. Here are the steps you need to follow to install a WPC bathroom door:
Measure the door frame
Before you purchase your WPC bathroom door, you need to measure the door frame to ensure that the door fits properly. Measure the width and height of the door frame, and make sure to account for any molding or trim that will be installed around the door. Once you have your measurements, purchase a WPC door that is the correct size.
Remove the old door
If you’re replacing an existing door, remove it by removing the hinge pins and lifting the door out of the frame. If the old door is in good condition, you may be able to reuse the hinges, but if the hinges are damaged or rusted, you’ll need to replace them.
Prepare the door frame
Before you can install the WPC door, you need to prepare the door frame. Remove any nails or screws from the frame, and make sure that it is clean and free of debris. If the frame is damaged or warped, you may need to repair or replace it before you can install the new door.
Install the hinges
Install the hinges onto the WPC door by screwing them into the pre-drilled holes on the edge of the door. The hinges should be placed at the top and bottom of the door, with the center of the hinge lined up with the center of the door.
Hang the door
With the hinges attached to the WPC door, you can now hang the door in the frame. Place the hinges into the hinge mortises on the door frame, and use a screwdriver to secure the hinges in place. Test the door to make sure it opens and closes smoothly.
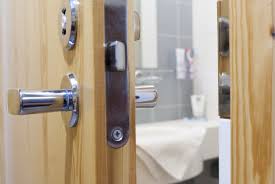
Install the handle and lock
If your WPC door has a handle and lock, install them according to the manufacturer’s instructions. Make sure that the handle and lock are installed at the correct height and in the correct location on the door.
Install the molding and trim
Finally, install molding and trim around the WPC door to cover any gaps between the door and the frame. Use a saw to cut the molding and trim to the correct size, and use a nail gun or hammer and nails to attach the trim to the frame.
Tips for Installing WPC Bathroom Doors
Use the right tools
To install a WPC bathroom door, you’ll need a few basic tools, including a drill, screwdriver, saw, and hammer. Make sure that you have all the tools you need before you start the installation process.
Follow the manufacturer’s instructions
Each WPC door may have slightly different installation instructions, so make sure to read and follow the manufacturer’s instructions carefully. If you’re unsure about any aspect of the installation process, contact the manufacturer for guidance.
Consider hiring a professional
If you’re not confident in your DIY skills, or if you’re installing multiple doors. Consider hiring a professional to do the installation for you. A professional installer will have the tools and expertise to install your WPC doors quickly and correctly.
Maintain your WPC doors
WPC doors are low-maintenance, but they still require some care to keep them looking and functioning their best. Regularly clean your WPC doors with a mild soap and water solution, and avoid using harsh chemicals or abrasive cleaners. If you notice any damage or wear on your WPC doors, repair or replace them as needed.
In conclusion, installing WPC bathroom doors is a straightforward process. That can complete injust a few hours with the right tools and instructions. By following the steps outlined above and taking the necessary precautions. You can install WPC doors that will provide durability and style to your bathroom for years to come.