")
Installing deck flashing after the deck has been built is not ideal, but it can be done if the proper steps are taken. Deck flashing is an essential component of any deck construction project, as it helps to prevent water damage and prolong the life of your deck.
Deck flashing is a thin metal or plastic sheet that install between the ledger board and the house. It used to prevent water from seeping into the wood, which can lead to rot, decay, and structural damage. Deck flashing can also be install on the top of the ledger board and over the rim joist to create a barrier against water.
If you have already built your deck and did not install deck flashing, it is still possible to add it. Here are the steps you can follow to install deck flashing after the deck has been built:
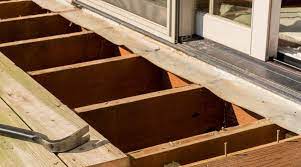
Step 1: Remove the Deck Boards
To install deck flashing properly, you will need to remove some of the deck boards near the ledger board. Start by identifying the location of the ledger board and then remove the deck boards that are closest to it. Use a pry bar or hammer to gently remove the deck boards.
Step 2: Clean the Area
Once the deck boards have been removed, you will need to clean the area thoroughly. Use a wire brush to remove any dirt, debris, or rust from the ledger board and rim joist. This step is crucial, as it will ensure that the deck flashing adheres properly to the wood.
Step 3: Measure and Cut the Deck Flashing
Measure the length and width of the ledger board and rim joist. Then, use those measurements to cut the deck flashing to the appropriate size. Deck flashing can be purchased in rolls or sheets at most hardware stores. If you are unsure of the size you need, it is always better to purchase more than you think you will need.
Step 4: Install the Deck Flashing
Once the deck flashing has been cut to size, it is time to install it. Start by placing the deck flashing over the ledger board, making sure that it extends up the wall behind the siding. Then, install the flashing over the rim joist, making sure that it extends over the top of the ledger board. Use roofing nails or screws to secure the flashing to the wood.
Step 5: Replace the Deck Boards
After the deck flashing has install, it is time to replace the deck boards that were remov. Use new screws or nails to secure the boards to the joists.
Step 6: Seal the Deck Boards
Once the deck boards have replac, it is important to seal them to prevent water from seeping into the wood. Use a waterproofing sealer to coat the top and sides of each board. This step will help to prolong the life of your deck by preventing rot, decay, and insect damage.
Step 7: Maintain the Deck
To keep your deck in good condition, it is important to maintain it regularly. This includes cleaning it regularly, removing any debris or leaves, and resealing it every few years. Regular maintenance will help to prevent water damage and prolong the life of your deck.
Conclusion
Installing deck flashing after the deck has been built is not ideal, but it can be done if the proper steps are taken. The key to success is to ensure that the area is clean and that the flashing installs correctly. If you are unsure of how to install deck flashing or if you need assistance, it is always best to consult with a professional contractor. They can provide guidance and advice on the best way to protect your deck from water damage and other types of damage that can occur over time.