")
Pressure washing a metal roof is a great way to restore its appearance and remove dirt, grime, and other debris that can accumulate over time. However, it’s important to use the right equipment and techniques to avoid damaging the roof or causing injury. In this article, we’ll go over the steps involved in pressure washing a metal roof safely and effectively.
Choose the Right Pressure Washer
The first step in pressure washing a metal roof is to choose the right pressure washer. You’ll want a pressure washer that’s powerful enough to remove dirt and grime, but not so powerful that it damages the roof. Ideally, you should use a pressure washer with a maximum pressure of around 1500 psi and a flow rate of around 1.5 gallons per minute. You should also use a pressure washer with a spray nozzle that can adjust the pressure to a lower setting.
Gather Your Materials
In addition to a pressure washer, you’ll need a few other materials to pressure wash your metal roof. These include:
Safety equipment: Eye protection, ear protection, and non-slip shoes are essential safety equipment when pressure washing a roof.
Cleaning solution: You can use a commercial metal roof cleaner or a mixture of water and mild detergent to clean your metal roof.
Ladder: You’ll need a sturdy ladder to climb onto the roof and to move around while pressure washing.
Garden hose: You’ll need a garden hose to rinse the roof after pressure washing.
Soft-bristled brush: A soft-bristled brush can be helpful for removing stubborn stains or debris.
Prepare the Roof
Before you begin pressure washing, you’ll need to prepare the roof. This includes removing any debris, such as branches or leaves, from the roof. You should also trim any nearby trees or bushes to prevent them from scratching the roof or obstructing your view while pressure washing. Finally, you should cover any nearby plants or landscaping with plastic sheeting to protect them from the cleaning solution.
Apply the Cleaning Solution
Once the roof is prepared, it’s time to apply the cleaning solution. You can do this by using a pump sprayer or a garden sprayer to apply the solution evenly over the roof. Make sure to cover the entire roof with the cleaning solution, including the gutters and any other metal surfaces. Allow the cleaning solution to sit for a few minutes to loosen dirt and grime.
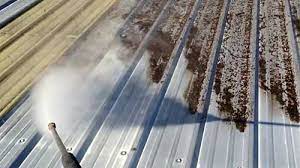
Pressure Wash the Roof
After the cleaning solution has had time to work, it’s time to pressure wash the roof. Start by standing on the ladder and using the pressure washer to spray water onto the roof at a low pressure. Work in sections, starting at the top of the roof and working your way down. Keep the pressure washer at a safe distance from the roof, at least 6 inches, to avoid causing damage.
Rinse the Roof
Once you’ve pressure washed the entire roof, it’s time to rinse it off. Use a garden hose to rinse the roof with clean water, starting at the top and working your way down. Make sure to rinse off all the cleaning solution and any remaining dirt or debris. Take care not to spray water into the roof vents or any other openings.
Inspect the Roof
After rinsing the roof, take the time to inspect it for any damage or areas that may need repair. Look for any dents, scratches, or rust spots that may have been hidden by the dirt and grime. If you notice any damage, consider calling a professional to make repairs.
In conclusion, pressure washing a metal roof can be an effective way to restore its appearance and remove dirt and grime. However, it’s important to use the right equipment and techniques to avoid causing damage to the roof or causing injury.