")
Removing tiles from the plasterboard can be a tricky and time-consuming process, but with the right tools and techniques, it can be done without damaging the underlying plasterboard. In this article, we will outline the steps to safely and effectively remove tiles from the plasterboard.
Step 1: Prepare the work area
Before you begin removing tiles from the plasterboard, you need to prepare the work area. Remove any furniture, fixtures, or accessories from the room, and cover the floor with a protective tarp or drop cloth. Wear protective gloves, goggles, and a dust mask to protect yourself from sharp tile fragments and dust.
Step 2: Remove the grout
The first step in removing tiles from the plasterboard is to remove the grout surrounding the tiles. Grout is a cement-like material that fills the gaps between tiles. Use a grout saw or oscillating tool with a grout removal blade to carefully cut through the grout, being careful not to damage the surrounding tiles or plasterboard.
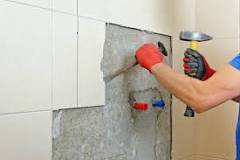
Step 3: Loosen the tiles
Once the grout has been removed, you can begin loosening the tiles. Use a hammer and chisel to gently tap the tiles along the edges and corners, loosening them from the adhesive. Work slowly and carefully, applying only enough force to loosen the tiles without cracking or damaging them.
Step 4: Remove the tiles
Once the tiles are loosened, you can remove them from the plasterboard. Use a pry bar or putty knife to gently lift the tiles from the adhesive, working from the edges towards the center of the tile. Be careful not to pry too hard or use excessive force, as this can damage the plasterboard.
Step 5: Remove the adhesive
Once the tiles are removed, you need to remove the adhesive from the plasterboard. Use a scraper or putty knife to carefully scrape away the adhesive, being careful not to damage the plasterboard. If the adhesive is particularly stubborn, you can use a heat gun or steam cleaner to soften the adhesive and make it easier to remove.
Step 6: Repair any damage
Once the tiles and adhesive are removed, you may notice some damage to the plasterboard, such as scratches or dents. Use spackling compound or joint compound to fill in any holes or gaps in the plasterboard, and sand the surface smoothly once the compound is dry.
Tips for removing tiles from plasterboard:
- Wear protective gloves, goggles, and a dust mask to protect yourself from sharp tile fragments and dust.
- Use a grout saw or oscillating tool with a grout removal blade to carefully cut through the grout.
- Use a hammer and chisel to gently tap the tiles along the edges and corners, loosening them from the adhesive.
- Use a pry bar or putty knife to gently lift the tiles from the adhesive, working from the edges towards the center of the tile.
- Use a scraper or putty knife to carefully scrape away the adhesive, being careful not to damage the plasterboard.
- Use a heat gun or steam cleaner to soften the adhesive and make it easier to remove.
- Use spackling compound or joint compound to fill in any holes or gaps in the plasterboard, and sand the surface smooth once the compound is dry.
In conclusion, removing tiles from the plasterboard can be a challenging task, but by following the steps outlined above and taking the necessary precautions, you can do it safely and effectively without damaging the underlying plasterboard. Remember to take your time, work carefully, and wear protective gear to ensure a successful tile removal project.