")
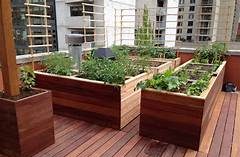
Roof deck planters are a wonderful addition to any outdoor space, providing a beautiful and lush environment in an otherwise limited area. If you’re interested in creating your own roof deck planters, here’s a step-by-step guide to help you get started:
Step 1: Assess Your Space
Begin by assessing your roof deck to determine the available space for your planters. Consider factors such as sunlight exposure, wind patterns, and weight-bearing capacity of the deck. Take measurements to determine the size and number of planters you can accommodate.
Step 2: Choose the Right Planters
Select planters that are suitable for your space and style preferences. Look for lightweight and weather-resistant materials, such as fiberglass, plastic, or lightweight concrete. Ensure that the planters have proper drainage holes to prevent waterlogging and ensure the health of your plants.
Step 3: Select the Plants
Choose plants that are suitable for the rooftop environment, considering factors such as sunlight exposure, wind resistance, and the weight they will add to the planters. Opt for plants that are low maintenance and well-suited to container gardening. Consider a mix of flowers, foliage plants, and even small shrubs or dwarf trees to add variety and visual interest.
Step 4: Prepare the Planters
Before planting, prepare the planters by placing a layer of gravel or small rocks at the bottom. This will aid in drainage and prevent water from pooling at the bottom of the containers. Fill the planters with a high-quality potting mix, specifically formulated for container gardening, ensuring it is well-draining and nutrient-rich.
Step 5: Plant Your Selections
Carefully plant your chosen plants in the prepared planters, following the spacing and planting depth guidelines specific to each plant. Ensure that the plants are firmly placed in the soil and gently pat down the soil around the roots. Water the newly planted containers thoroughly to help settle the soil.
Step 6: Arrange the Planters
Consider the layout and arrangement of your planters on the roof deck. Create an appealing visual display by varying the heights and sizes of the planters. Group plants with similar sunlight and watering needs together to facilitate maintenance. You can also incorporate trellises or supports for climbing plants to add vertical interest.
Step 7: Provide Proper Care
Regularly monitor and care for your roof deck planters. Water the plants as needed, keeping in mind that rooftop environments can be windy and dry, requiring more frequent watering. Provide adequate sunlight or shade based on the plant’s requirements. Fertilize your plants according to the recommendations for the specific plant species.
Step 8: Maintain the Planters
Regularly check the planters for any signs of damage or wear. Replace or repair any broken or deteriorating planters. Prune and trim the plants as necessary to maintain their shape and promote healthy growth. Remove any weeds or dead foliage to keep the planters looking their best.
Step 9: Enjoy Your Rooftop Oasis
Once your roof deck planters are in place and well-maintained, take the time to relax and enjoy your rooftop oasis. Create a cozy seating area nearby to fully appreciate the beauty and tranquility of your rooftop garden.
Remember to check local building codes and regulations before installing roof deck planters, as there may be specific guidelines regarding weight limits and structural considerations. With proper planning, care, and attention, your roof deck planters will transform your rooftop into a green sanctuary that you can enjoy throughout the seasons.