")
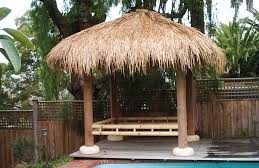
A thatched roof pergola is a charming and unique addition to any outdoor space. With its natural and rustic aesthetic, a thatched roof pergola creates a cozy and inviting atmosphere, perfect for enjoying the outdoors while providing shade and protection from the elements. In this ultimate guide, we will walk you through the step-by-step process of installing a thatched roof pergola, ensuring a successful and beautiful addition to your outdoor living area.
Planning and Preparation:
Before beginning the installation process, take time to carefully plan and prepare. Start by selecting the location for your pergola, considering factors such as sunlight exposure, proximity to other structures, and views. Measure the area to determine the size of the pergola and ensure it fits within your desired space.
Obtain Necessary Permits:
Check with your local building authority to determine if any permits or approvals are required for installing a thatched roof pergola. Regulations may vary depending on your location, so it’s important to comply with any necessary requirements.
Choose the Right Materials:
Select high-quality materials for your thatched roof pergola to ensure durability and longevity. Opt for treated or naturally resistant wood, such as cedar or redwood, for the frame. These materials are sturdy and resistant to rot, insects, and weathering. For the thatch, choose a natural and fire-retardant material, such as water reed or palm thatch, which will provide the desired rustic look and protection from the sun and rain.
Build the Pergola Frame:
Start by constructing the frame of the pergola according to your desired design. Follow the manufacturer’s instructions or work with a professional to ensure proper construction. Use sturdy posts, beams, and cross-members to create a solid structure that can support the weight of the thatched roof.
Install the Roof Structure:
Once the pergola frame is complete, it’s time to install the roof structure. Begin by attaching horizontal rafters or purlins across the top of the frame, evenly spaced to provide support for the thatch. Make sure these rafters are securely fastened to the frame to ensure stability.
Thatch Installation:
Thatching a roof requires skill and precision. If you’re not experienced in thatching, it’s recommended to hire a professional thatcher for this step. Thatchers have the expertise and knowledge to properly install the thatch and ensure a tight, weatherproof roof. They will carefully layer the thatch material, starting from the bottom and working their way up, overlapping each layer to shed water effectively. This process requires attention to detail and precision to create an even and visually appealing thatched roof.
Maintenance and Care:
Proper maintenance is essential to ensure the longevity of your thatched roof pergola. Regularly inspect the thatch for signs of wear, damage, or mold growth. Trim any overhanging branches or vegetation that may cause damage or retain moisture. Additionally, consider applying a fire retardant treatment to the thatch to enhance its fire resistance and protect it from potential hazards.
Enjoy Your Thatched Roof Pergola:
Once the installation is complete and the necessary maintenance measures are in place, it’s time to enjoy your beautiful thatched roof pergola. Furnish the space with comfortable seating, outdoor accessories, and perhaps even outdoor lighting to create a cozy and inviting atmosphere for relaxing, entertaining, and enjoying the outdoors.
Conclusion:
Installing a thatched roof pergola is a wonderful way to add a touch of rustic charm and natural beauty to your outdoor space. By carefully planning, selecting quality materials, constructing a solid frame, and enlisting professional help for thatching, you can create a stunning and functional addition to your outdoor living area. Remember to comply with any necessary permits and regulations, choose fire-retardant and durable thatching materials, and regularly maintain and care for your thatched roof pergola.