")
Have you ever heard of a vacuum plumbing system? It sounds kind of futuristic, right? Well, it’s actually an incredibly smart and sustainable plumbing solution that’s growing in popularity. If you’re curious about how it works, why it’s awesome, and how to install one, buckle up. This is The Ultimate Guide to Installing a Vacuum Plumbing System, written just for YOU.
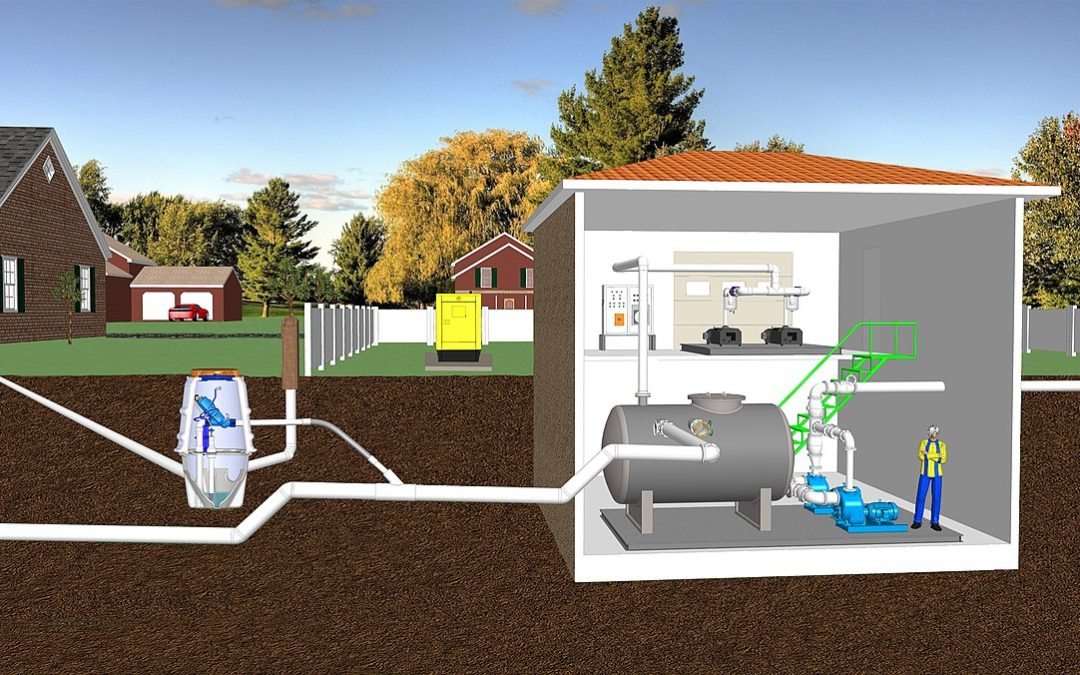
Before we get into the nitty-gritty, let’s break it down so it’s super clear. A vacuum plumbing system doesn’t rely on gravity like regular plumbing systems. Instead, it uses vacuum technology benefits to quickly and efficiently move wastewater through a network of pressure pipes. This clever method saves water, reduces installation challenges, and even has major environmental impact benefits. Fancy, right? Now, let’s take this step by step!
What Is a Vacuum Plumbing System?
Think of a regular plumbing system like a giant slide. Gravity pulls wastewater down pipes until it reaches a treatment plant. But with a vacuum plumbing system, it’s like using a turbocharged vacuum cleaner to transport an air-water mixture from place to place. Instead of relying on gravity, it relies on high-powered air circulation.
These systems are ideal for places like healthcare plumbing solutions, educational facility plumbing, and even busy spaces like supermarkets or high-traffic plumbing areas. Why? Because they’re ultra-efficient and designed to handle different demands. They’re also perfect for mobile facility systems, where traditional plumbing just wouldn’t cut it.
Vacuum plumbing systems are also super adaptable. Whether you’re planning a major building renovation or want future-proof plumbing for a brand-new project, these systems offer amazing design flexibility and remodeling flexibility.
Benefits of Vacuum Plumbing Systems
Why choose a vacuum plumbing system over traditional options? Let’s talk perks:
- Water Savings
The system uses significantly less flushing water, sometimes up to 80% less! That’s a huge win for both your wallet and the environment. - Slab Penetration Reduction
Traditional plumbing alternatives require lots of cuts into the flooring to install the pipework. But with a vacuum plumbing system, there’s far less need for that, which means less construction hassle. - Energy-Efficient Plumbing
These systems are designed to operate with high-efficiency systems, cutting down on wasted energy and ensuring smooth waste transport. - Hygienic Toilets
The vacuum setup helps maintain cleaner, healthier bathrooms since the system minimizes odor and bacteria. - Non-Blocking Technology
Say goodbye to clogs! Vacuum technology benefits include a clever high-velocity flow system that prevents blockages. - Environmental Impact
Lower water savings and efficient wastewater collection contribute to greener living.
Common Applications of Vacuum Plumbing Systems
Where can you use a vacuum plumbing system? Almost anywhere! From dental vacuum plumbing systems in clinics to cold storage plumbing in giant freezers, the possibilities are endless. Here are some examples:
- Healthcare plumbing solutions like hospitals, where sanitation and efficiency are critical.
- Remote locations with mobile facility systems, such as temporary event venues.
- Compact areas like floor shower drains or shower stalls, where space is tight but functionality matters.
Step-by-Step Installation of a Vacuum Plumbing System
Now that you’ve been wowed by all the benefits, it’s time to discuss how to actually install one. Don’t worry; it’s easier than you might think, thanks to the ease of these systems.
1. Design the System Layout
Start by figuring out where you’ll put the key components. These include the vacuum station, pipelines, and fixtures like shower stalls or hygienic toilets. Make sure you keep plumbing design considerations in mind to ensure smooth operation.
2. Select High-Quality Equipment
For maximum success, invest in top-notch parts like acorn vacuum plumbing systems or acornvac vacuum plumbing system components. They’re known for their reliability and durability.
3. Connect the Pipe System
Begin the pipe installation, ensuring you have the right setup for air-water mixture transport. This might include pressure pipes or specialized fittings.
4. Set Up the Vacuum Pump
The vacuum pump is the heart of the system. Whether it’s for a vacuum chamber plumbing system, vacuum toilets, or other fixtures, it needs to be strategically located to optimize performance.
5. Test and Adjust
Once installed, run a thorough test. Check for leaks, ensure the non-blocking technology is working, and confirm the flows are up to par.
Cost and Long-Term Value of Vacuum Plumbing Systems
If you’re wondering, “What’s this all gonna cost?”, the answer is… it depends! Factors like system size and the complexity of the installation affect pricing. However, many people save money long-term thanks to flushing water reduction, lower maintenance costs, and the ability to install the system with less construction.
Plus, the system’s future-proof plumbing capabilities mean you won’t need constant renovations or upgrades. Whether you’re outfitting waste treatment facilities or tackling smaller-scale projects like a floor shower drain to the vacuum plumbing system, the savings will add up over time.
What to Consider Before Installing
While these systems are fantastic, they’re not perfect for all situations. Be sure to weigh the disadvantages of vacuum plumbing system installations. For example:
- Initial setup can be pricey.
- Highly specialized plumbing schematics for a power brake assist vacuum pump system may be required.
- You’ll need professional expertise to handle the installation.
That said, the pros often far outweigh the cons, especially for facilities with demanding waste management systems.
Why You Should Choose a Vacuum Plumbing System
At this point, it’s easy to see why these systems are taking over as the next big thing in plumbing alternatives. They help reduce waste, improve the effluent collection system, and promote smoother functionality. Whether you’re adding a vacuum system installation in a retrofitted building or integrating one into new high-traffic plumbing, it’s a game-changer.
And hey, if you’re asking, “Can I use plumbing tubing for a central vacuum system?” or wondering about plumbing schematics for a power brake vacuum assist pump system, fear not. Solutions like AcornVac vacuum plumbing systems and tailored designs have your back.
Final Thoughts
There you have it, folks! This is The Ultimate Guide to Installing a Vacuum Plumbing System, packed with tips, tricks, and everything you need to know. Whether you’re just getting started or already knee-deep in planning, it’s the smart, eco-friendly, and innovative answer for future-ready facilities.
Don’t forget the standout benefits like vacuum plumbing system shower drains, cleaner wastewater collection systems, and long-term value thanks to sustainable plumbing methods. There’s just no question that vacuum plumbing is the way forward!