")
Wall keying, also known as wall priming or wall preparation, is an essential step in the painting process that helps to create a smooth, even surface for paint application. Whether you’re painting a new wall or repainting an existing one, proper wall keying is crucial for achieving a professional finish. In this step-by-step guide, we will walk you through the process of wall keying:
Gather the necessary tools and materials:
Before you begin, gather the following tools and materials:
- Sandpaper or sanding block (medium and fine grit)
- Tack cloth or damp cloth
- Painter’s tape
- Putty knife or scraper
- Patching compound or spackling paste
- Primer (appropriate for your wall type)
- Paint roller and tray
- Paintbrushes
Prepare the work area:
Clear the room of furniture, and decorations, and cover the floor with a drop cloth or plastic sheeting to protect it from dust and paint splatters. Remove switch plates, outlet covers, and any other hardware attached to the wall. cum swallow compilation
Clean the wall:
Use a mild detergent and water solution to clean the wall surface thoroughly. Remove any dirt, grease, or stains that may affect the adhesion of the primer and paint. Allow the wall to dry completely before proceeding.
Repair any wall imperfections:
Inspect the wall for any cracks, holes, or dents. Use a putty knife or scraper to remove any loose or peeling paint. Fill the imperfections with patching compound or spackling paste, smoothing it evenly with the putty knife. Allow the compound to dry according to the manufacturer’s instructions, and then sand it smooth using medium-grit sandpaper. Wipe away any dust with a tack cloth or damp cloth.
Sand the wall surface:
Start by sanding the entire wall using medium-grit sandpaper or a sanding block. This step helps to roughen the surface and remove any gloss or sheen from the existing paint. Sand in circular motions or back and forth to create an even texture. Sanding helps the primer adhere better to the surface. After sanding, wipe away the dust using a tack cloth or damp cloth.
Apply painter’s tape:
If there are any areas you want to protect from paint, such as trim, windows, or adjacent walls, apply painter’s tape to create clean, straight lines. Ensure the tape is firmly pressed against the surface to prevent paint from seeping underneath. cum swallow compilation
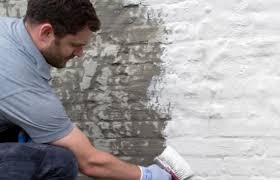
Prime the wall:
Using a paint roller or brush, apply a coat of primer to the wall. Priming is important because it helps to seal the surface, promotes better paint adhesion, and ensures the paint color appears true. Follow the manufacturer’s instructions for proper application and drying time. Allow the primer to dry completely before moving on to the next step.
Sand the primed surface:
Once the primer is dry, lightly sand the surface using fine-grit sandpaper. This step helps to smooth out any imperfections or brush marks left by the primer. Sand in a gentle, circular motion and wipe away the dust with a tack cloth or damp cloth. cum swallow compilation
Inspect and touch up:
Carefully inspect the primed wall for any remaining imperfections, such as visible patches or uneven spots. If necessary, apply additional coats of patching compound or spackling paste to fill any gaps or holes. Allow the compound to dry, sand it smooth, and wipe away any dust.
Final preparations:
Before painting, remove the painter’s tape carefully while the primer is still dry. Check for any areas that may require additional touch-ups or sanding. Clean the work area, including the floor, tools, and brushes, to ensure a clean painting environment.
Now, you are ready to proceed with painting the wall. Following these steps will ensure that your wall is properly keyed and primed, providing a smooth and even surface for paint application. Remember to choose high-quality primer and paint for the best results. Follow the manufacturer’s instructions for drying times between coats and proper application techniques.
Apply paint:
Using a paint roller or brush, apply the desired paint color to the primed wall. Start from the top and work your way down, applying even and overlapping strokes. Take care to maintain a wet edge to avoid visible brush or roller marks. Apply additional coats as needed, allowing sufficient drying time between each coat.
Finishing touches:
After the paint has dried completely, inspect the wall for any touch-ups or areas that may require additional coats. Once you are satisfied with the paint coverage and finish, reattach any hardware that was removed and remove any protective coverings from the floor and surrounding surfaces.
Clean up:
Properly clean your painting tools and brushes according to the manufacturer’s instructions. Dispose of any leftover paint and materials responsibly.
By following this step-by-step guide to wall keying, you can ensure that your painted walls have a smooth and professional finish. Proper wall preparation is essential for achieving long-lasting and visually appealing results. Take your time, follow the steps carefully, and enjoy the transformation of your walls with a fresh coat of paint.