")
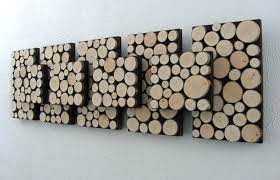
Wood slice wall decor is a popular and versatile DIY project that can add a natural and rustic touch to any room in your home. With just a few simple supplies and some creativity, you can create unique and personalized wood slice wall art. Here is a step-by-step guide to help you get started.
Step 1: Gather Supplies To create wood slice wall decor, you will need a few basic supplies:
- Wood slices: You can purchase wood slices at your local craft store, or cut your own from fallen branches or logs using a saw.
- Sandpaper: To smooth out any rough edges on the wood slices.
- Paint or stain: To add color or enhance the natural beauty of the wood slices.
- Paintbrushes: For applying paint or stain.
- Picture hangers or command strips: To hang the wood slices on the wall.
Step 2: Prepare the Wood Slices
If you are using wood slices that you cut yourself, make sure they are completely dry before you begin. You can dry them out by leaving them in a warm, dry place for a few days or by baking them in the oven at a low temperature for several hours.
Once your wood slices are dry, use sandpaper to smooth out any rough edges or bumps. Wipe off any sawdust with a damp cloth or brush.
Step 3: Paint or Stain the Wood Slices
Now it’s time to add some color or enhance the natural beauty of your wood slices. You can use paint or stain to achieve the look you want. If you want a natural, rustic look, consider using a clear or light-colored stain. If you want to add some color, choose a paint color that complements the style of your room.
Apply the paint or stain with a paintbrush, using long strokes to cover the entire surface of the wood slice. Allow the paint or stain to dry completely before moving on to the next step.
Step 4: Add Designs or Text
If you want to add some designs or text to your wood slice wall decor, now is the time to do it. You can use stencils, stamps, or freehand painting to create your designs.
To use stencils, place the stencil on the wood slice and hold it in place with painter’s tape. Use a small paintbrush to fill in the stencil with paint. Remove the stencil and allow the paint to dry completely.
To use stamps, dip the stamp in paint and press it onto the wood slice. Use a small paintbrush to fill in any areas that the stamp didn’t cover. Allow the paint to dry completely.
If you prefer freehand painting, use a small paintbrush and some acrylic paint to create your designs. You can paint anything from simple shapes to more intricate patterns or scenes.
Step 5: Hang the Wood Slices
Once your wood slices are painted and decorated to your liking, it’s time to hang them on the wall. You can use picture hangers or command strips to hang the wood slices.
To use picture hangers, screw the hanger into the back of the wood slice, making sure it is centered and level. Then, hang the wood slice on a nail or hook in the wall.
To use command strips, attach the strips to the back of the wood slice according to the package instructions. Then, press the wood slice onto the wall and hold it in place for a few seconds.
Step 6: Arrange and Display
Now that your wood slice wall decor is hanging on the wall, it’s time to arrange and display it. You can create a gallery wall with several wood slice pieces, or hang one or two as focal points in a room.
Consider grouping the wood slices by color or design, or mix and match for a more eclectic look. You can also experiment with different shapes and sizes of wood slices to create visual interest.
Another option is to create a themed display, such as a woodland or nature-inspired theme. You can add other natural elements, such as twigs, pine cones, or dried flowers, to enhance the rustic feel.
If you want to create a more functional piece of wall decor, you can use larger wood slices as shelves. Simply attach brackets to the back of the wood slice and mount it on the wall. This is a great way to display small plants, books, or other decorative objects.
Tips and Tricks
- If you are cutting your own wood slices, use a saw with a fine blade to ensure a smooth cut.
- To create a more distressed or vintage look, use sandpaper to rough up the edges of the wood slice after painting or staining.
- If you want to create a more polished look, add a coat of clear varnish or polyurethane to the wood slice after painting or staining.
- Consider using a wood burning tool to create designs or text on the wood slice for a more rustic or handmade feel.
- Don’t be afraid to mix and match different styles and colors of wood slices to create a unique and personalized display.
In conclusion, creating wood slice wall decor is a fun and easy DIY project that can add a touch of nature and rustic charm to any room in your home. With just a few simple supplies and some creativity, you can create a personalized and unique piece of wall art that is both beautiful and functional. So why not give it a try and see what kind of wood slice wall decor you can create?