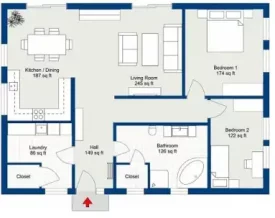
Floor plans are an essential part of the building process, and they help architects, builders, and clients understand the layout of a building. In today’s world, most floor plans are created using computer-aided design (CAD) software. These software tools make it easier for designers to create precise and detailed floor plans that meet the needs of their clients.
In this step-by-step guide, we’ll go over the basics of creating an engineered floor plan, including the software and tools you’ll need to get started.
Step 1: Choose Your Software
The first step in creating an engineered floor plan is to choose the right software. There are many options available, including AutoCAD, SketchUp, and Revit. These software tools offer a wide range of features and capabilities, but they also come with a learning curve. If you’re new to floor plan design, we recommend starting with a simple software tool like SketchUp.
Step 2: Gather Your Data
Before you start designing your floor plan, you need to gather all the necessary data. This includes the dimensions of the building, the location of walls, doors, and windows, and any other relevant details. You can get this information from a variety of sources, including blueprints, surveys, and site visits.
Step 3: Create Your Base Plan
Once you have all the necessary data, it’s time to create your base plan. This is the foundation of your floor plan and includes all the basic information about the building, such as its size and shape, the location of walls and doors, and the placement of windows.
To create your base plan, start by importing your data into your chosen software. Then, use the software’s tools to draw out the basic shape of the building and add in the walls, doors, and windows. Make sure to double-check all your measurements and dimensions to ensure accuracy.
Step 4: Add Your Design Elements
With your base plan in place, it’s time to start adding your design elements. This includes things like furniture, appliances, and fixtures. You can either create these elements from scratch using your software’s tools or import pre-made models from online libraries.
As you add your design elements, make sure to consider things like traffic flow, functionality, and aesthetics. The goal is to create a floor plan that is both practical and visually appealing.
Step 5: Review and Revise
Once you’ve created your initial floor plan, it’s important to review it and make any necessary revisions. This could include adjusting the placement of walls, doors, or windows, or tweaking the size or layout of your design elements.
During this stage, it’s also a good idea to share your floor plan with others, such as your clients or colleagues, and get their feedback. This can help you identify any issues or problems that you may have missed and ensure that your final design is as effective as possible.
Step 6: Finalize Your Design
After you’ve made all the necessary revisions, it’s time to finalize your design. This involves creating a detailed, to-scale drawing of your floor plan that includes all the necessary dimensions and labels.
Your final design should also include any notes or annotations that will be helpful to builders and contractors during the construction process. This could include information about materials, construction methods, or other relevant details.
Step 7: Get Approval and Permits
Before you can start building, you’ll need to get approval from local authorities and obtain any necessary permits. This may involve submitting your floor plan to a building inspector or other regulatory agency for review.
Make sure to carefully review all the requirements and regulations in your area to ensure that your floor plan meets all the necessary criteria. This can help prevent delays or other issues during the construction process.
Step 8: Implement Your Plan
With your final design approved and permits obtained, it’s time to start implementing your plan. This may involve working with a builder, contractor, or other construction professionals to ensure that your floor plan is executed properly.
During the construction process, it’s important to keep your final design handy and refer to it often. This can help ensure that the construction team is following your plan accurately and can help prevent any mistakes or miscommunications.
Step 9: Monitor and Adjust
Even after construction has begun, it’s important to monitor the progress of your project and make any necessary adjustments. This could include tweaking the placement of design elements or making changes to the construction plan based on unforeseen challenges or obstacles.
Regular monitoring and adjustment can help ensure that your final product meets your expectations and stays on track with your budget and timeline.
Step 10: Celebrate Your Success!
Finally, once your construction project is complete, it’s time to celebrate your success! Take the time to appreciate all the hard work and dedication that went into creating your engineered floor plan and bring your vision to life. Floor plans
Conclusion:
Creating an engineered floor plan can be a complex and challenging process, but with the right tools and approach, it can also be incredibly rewarding. By following these ten steps, you can create a precise and detailed floor plan that meets your needs and helps you achieve your construction goals. Whether you’re a builder, architect, or homeowner, an engineered floor plan can help you turn your vision into reality and create a beautiful, functional, and sustainable building that stands the test of time.

