")
A floating slab, also known as a slab on grade, is a type of foundation commonly used in construction. It is a single layer of concrete that is poured directly onto the ground without any kind of support, making it appear as if it is “floating.” This type of foundation is a cost-effective and straightforward way to build on level ground.
If you’re planning to build a structure using a floating slab, here is a step-by-step guide to help you through the installation process.
Evaluate the Ground
Before starting your project, it’s crucial to evaluate the ground’s condition to ensure that it’s suitable for a floating slab. The soil needs to be well-drained and stable to prevent any settlement or shifting that could compromise the slab’s stability. Make sure that there are no rocks, roots, or debris that could interfere with the pour.
Prepare the Site
Clear the site of any vegetation, debris, or obstacles that could hinder the pour. Excavate the soil and level the ground to the desired height, taking into account the slab’s thickness, as well as any insulation, vapor barriers, or reinforcing materials that will be used.
Install Formwork
Formwork is required to contain the concrete while it is being poured and to give the slab its desired shape. The formwork should be made of strong and durable materials such as wood or steel. The formwork should be carefully measured and installed to ensure that the slab is level and even.
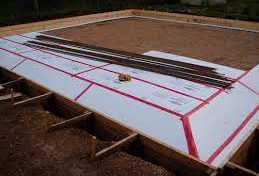
Install Vapor Barrier and Insulation
A vapor barrier is necessary to prevent moisture from the ground from seeping into the concrete and causing damage over time. It’s essential to install it before pouring the slab. Insulation is also recommended to keep the floor warm and prevent heat loss. Insulation can be laid on top of the vapor barrier.
Install Reinforcement
Reinforcing steel is necessary to strengthen the slab and prevent cracking over time. The steel bars or mesh should be installed on top of the insulation, and it should be spaced appropriately. The reinforcement should be elevated from the ground using plastic or metal chairs to prevent it from settling during the pour.
Pour the Concrete
Once the site is prepared and the formwork is installed, the concrete can be poured. The concrete should be mixed according to the manufacturer’s instructions and poured into the formwork. It’s important to use a concrete pump or mixer to ensure that the concrete is distributed evenly.
Level the Concrete
After the concrete is poured, it needs to be leveled to ensure that it’s even and flat. Use a straightedge or level to check the surface and make any necessary adjustments before the concrete sets.
Cure the Concrete
Curing is a critical process that allows the concrete to dry and harden slowly over time. Proper curing is necessary to ensure that the concrete is strong and durable. It’s essential to follow the manufacturer’s instructions for curing time and temperature.
Remove the Formwork
Once the concrete is cured, the formwork can be removed. Carefully remove the formwork, taking care not to damage the slab’s edges. The slab should be allowed to dry completely before installing any finishes, such as tile or carpet.
In conclusion, installing a floating slab is a straightforward process that requires careful planning and attention to detail. With the proper preparation and execution, you can have a durable and reliable foundation for your building project.