")
A utility sink is a versatile addition to any home, providing a convenient place to wash your hands, clean up after messy projects, or soak and wash larger items. Installing a utility sink is a relatively straightforward process that can be completed in a few hours with basic plumbing knowledge and tools. In this article, we’ll walk you through the steps of how to install a utility sink in your home.
Materials Needed:
Utility sink
P-trap
PVC pipe
Teflon tape
Adjustable wrench
Hacksaw
Screwdriver
Silicone caulk
Utility knife
Step 1: Choose the location for your utility sink
The first step in installing a utility sink is to choose a location for it. A utility sink is typically installed in a garage, laundry room, or basement, but can be installed in any area where you need easy access to water. You will need to have access to plumbing and a drain in order to install the sink, so consider the location of existing plumbing when choosing a location.
Step 2: Prepare the area for installation
Before you begin installing the sink, you will need to prepare the area where it will be installed. Clear out any existing fixtures or storage in the area, and ensure that the floor and walls are clean and free of debris. Use a level to ensure that the area is even and the sink will be installed correctly.
Step 3: Install the faucet
The next step is to install the faucet on the sink. Follow the manufacturer’s instructions to attach the faucet to the sink. Typically, this involves inserting the gasket and washer onto the bottom of the faucet, then securing it in place with a locknut. Make sure the faucet is securely attached to the sink before moving on to the next step.
Step 4: Install the sink
Now it’s time to install the sink. Place the sink into the hole in the countertop, making sure it is level and centered. Use a pencil to mark the location of the sink on the countertop, then remove the sink. Apply a bead of silicone caulk around the perimeter of the marked area on the countertop, then place the sink back into the hole. Press down firmly to ensure a good seal.
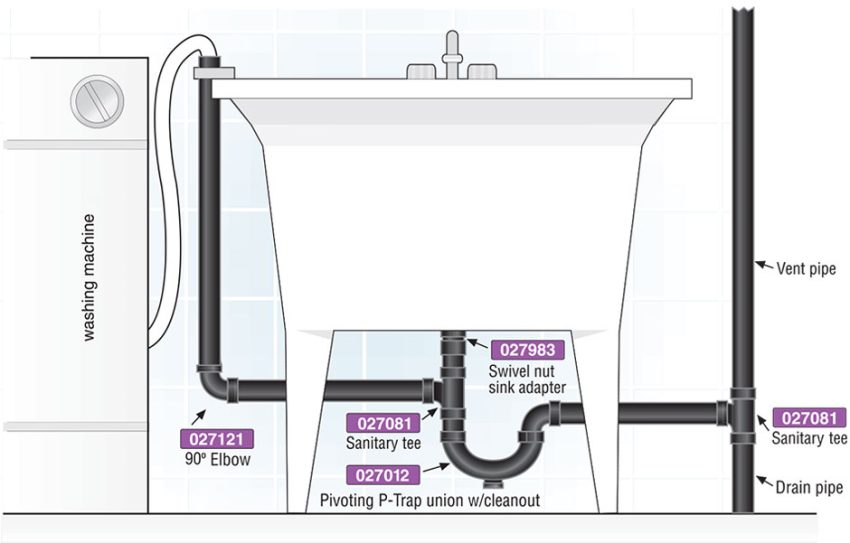
Step 5: Install the drain
The next step is to install the drain for the sink. First, install the P-trap onto the bottom of the sink, using Teflon tape to ensure a watertight seal. Next, use a PVC pipe to connect the P-trap to the existing drain line. Cut the PVC pipe to the appropriate length using a hacksaw, then use Teflon tape to secure the connections. Make sure the drain line is sloped slightly downward to ensure proper drainage.
Step 6: Connect the water supply
The final step is to connect the water supply to the sink. Use a screwdriver to remove the cap from the hot and cold water supply lines. Connect the hot and cold water supply lines to the faucet on the sink, using Teflon tape to ensure a watertight seal. Turn on the water supply to the sink, and check for any leaks.
In conclusion
Installing a utility sink is a relatively simple process that can be completed with basic plumbing knowledge and tools. By following these steps, you can install a utility sink in your home and enjoy the convenience of having a dedicated space for washing your hands, cleaning up after messy projects, and soaking and washing larger items. With proper installation and maintenance, a utility sink can provide years of reliable use in your home.