")
Installing an Alaskan floating slab is a popular method for constructing foundations in regions with cold climates, such as Alaska. This type of foundation provides insulation and protection against frost heave, which can cause significant damage to conventional foundations. If you’re considering installing an Alaskan floating slab, follow these step-by-step instructions to ensure a successful installation:
Prepare the Site
Start by preparing the site for the foundation. Clear the area of any vegetation, rocks, or debris. Excavate the soil to the desired depth, taking into consideration the local frost depth requirements and any additional requirements specified by building codes or regulations. Ensure the soil is well compacted and level.
Install Insulation
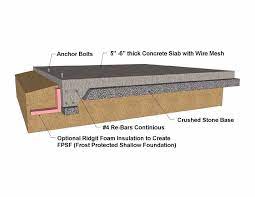
Insulation is a key component of an Alaskan floating slab. Lay a layer of rigid insulation boards, such as expanded polystyrene (EPS) or extruded polystyrene (XPS), over the prepared soil. The insulation should cover the entire area within the foundation footprint. Ensure the insulation boards fit tightly together, without any gaps or overlaps. Use adhesive or tape to secure the insulation boards to prevent shifting during concrete placement.
Install Vapor Barrier
To prevent moisture from migrating into the slab, install a vapor barrier over the insulation. Use a high-quality polyethylene sheet with a minimum thickness of 6 mils. Lay the vapor barrier in such a way that it covers the entire insulation area, extending up the sides of the excavated area. Overlap the seams by at least 12 inches and tape them securely to create a continuous and watertight barrier.
Place Reinforcement
Reinforcement is essential to provide strength and stability to the concrete slab. Install a layer of reinforcing steel mesh or rebar over the vapor barrier. Use a grid pattern with the spacing specified by the structural engineer or building codes. Ensure the reinforcement is positioned at the center of the slab’s thickness and adequately elevated from the insulation to prevent it from contacting the ground directly.
From the Perimeter
Construct forms around the perimeter of the foundation area using wooden boards or metal forms. The forms should be sturdy and securely anchored to prevent movement during the concrete placement. Ensure the forms are properly aligned and leveled. Install expansion joints at regular intervals, following the manufacturer’s recommendations, to allow for expansion and contraction of the slab.
Pour and Level the Concrete
With the forms in place, it’s time to pour the concrete. Use a high-quality concrete mix suitable for the specific application. Start by pouring concrete into the forms, ensuring it fills the entire area evenly. Use a screed board or a vibrating screed to level the surface of the concrete. Remove excess concrete and fill any voids or low spots. Work the concrete with a bull float or trowel to achieve a smooth and even finish.
Cure and Protect the Slab
Proper curing is essential for the strength and durability of the slab. After the concrete is placed, cover the slab with a curing compound or a curing blanket to retain moisture and promote proper hydration. Follow the manufacturer’s instructions for the specific curing method you choose. Protect the slab from excessive moisture, extreme temperatures, and physical damage during the curing process.
Finish and Seal the Slab
Once the concrete has cured, remove the forms and clean the surface of the slab. Apply a concrete sealer to enhance durability and protect the slab from moisture penetration. Choose a sealer appropriate for the specific application and follow the manufacturer’s instructions for application and maintenance. Consider adding a non-slip additive if the slab will be subjected to wet conditions.
By following these step-by-step instructions, you can successfully install an Alaskan floating slab. However, it’s important to note that building codes, regulations, and specific site conditions may vary. Therefore, it’s crucial to consult with a professional engineer or contractor who can provide guidance and ensure compliance with local requirements. They can also assess the soil conditions, insulation requirements, and structural considerations specific to your project.