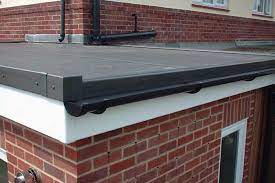
Flat roofing edge trim is an essential component of any flat roofing system, as it provides a durable and attractive edge finish. The trim helps protect the roofing material from weathering, prevents water infiltration, and adds an aesthetic touch to the roofline. In this article, we will discuss how you can transform your home with flat roofing edge trim.
Choose the Right Material
The first step in transforming your home with flat roofing edge trim is to choose the right material. There are different types of edge trims available in the market, including aluminum, PVC, and steel. Each material has its unique features and benefits. Aluminum is lightweight, corrosion-resistant, and easy to install, while PVC is durable, affordable, and weather-resistant. Steel is strong, long-lasting, and offers excellent protection against the elements.
Consider the Color
Flat roofing edge trim is available in a range of colors to match your roof’s color scheme. Choosing a color that complements the roof and the rest of the house’s exterior is essential for a cohesive look. Consider the color of your roof, siding, and trim when selecting the edge trim color.
Measure Carefully
To ensure that the flat roof edge trim fits correctly, measure the length and width of the roof edge accurately. Cut the trim to the correct length using a saw or tin snips and attach it to the roof using screws or adhesive.
Choose the Right Profile
Flat roof edge trim comes in different profiles, including L-shaped, T-shaped, and U-shaped. The profile you choose will depend on the type of roofing system you have and the style of your home. L-shaped edge trim is suitable for flat roofs with parapet walls, while T-shaped edge trim is ideal for roofs with a sloping edge. U-shaped edge trim is versatile and can be used on a range of roof types.
Install Properly
To ensure that the flat roofing edge trim is installed correctly, follow the manufacturer’s instructions carefully. Make sure to use the right fasteners and adhesive to secure the trim to the roof. Ensure that the edge trim is properly aligned and leveled to prevent water infiltration.
Seal the Joints
To prevent water infiltration and protect the roofing material, seal the joints between the edge trim and the roof surface. Use a high-quality sealant that is compatible with the roofing material and the edge trim material.
Maintain Regularly
Regular maintenance is essential to keep the flat roof edge trim in good condition. Check the trim regularly for signs of damage or wear and tear. Replace any damaged or worn-out edge trim promptly to prevent water infiltration and protect the roofing material.
Add Accessories
To enhance the appearance of the flat roofing edge trim, consider adding accessories such as guttering and downpipes. These accessories not only add a decorative touch but also provide essential protection against water damage.
Upgrade Your Roofing System
Installing flat roofing edge trim is an excellent opportunity to upgrade your roofing system. Consider upgrading to a more durable and energy-efficient roofing material such as metal or rubber. This will not only improve the look of your home but also increase its value and reduce energy costs.
Hire a Professional
Installing flat roofing edge trim requires skill and experience. If you are not confident in your DIY skills, it is best to hire a professional roofing contractor. A professional will ensure that the edge trim is installed correctly and that all the necessary steps are taken to protect your home from water infiltration.
In conclusion, flat roof edge trim is an essential component of any flat roofing system. It provides a durable and attractive edge finish while protecting the roofing material from weathering and water infiltration. By choosing the right material, color, profile, and installation method, you can transform your home’s exterior and increase its value.

