")
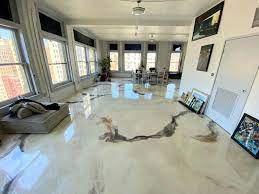
Marble epoxy flooring is a popular choice for those looking to transform the look of their home’s floors. It’s an affordable, long-lasting, and attractive option that can give any room a fresh and modern look. Here’s everything you need to know about marble epoxy flooring and how to install it in your home.
What is Marble Epoxy Flooring?
Marble epoxy flooring is a type of flooring that consists of a base layer of epoxy and a top layer of marble chips. The epoxy is a two-part adhesive that hardens when it’s mixed together. The marble chips are mixed into the epoxy and then spread over the surface of the floor. Once the epoxy has dried and cured, the surface is polished to give it a smooth, glossy finish that looks like real marbles.
Benefits of Marble Epoxy Flooring
There are several benefits to choosing marble epoxy flooring for your home. First, it’s a durable and long-lasting option that can withstand heavy foot traffic and is resistant to stains and spills. Second, it’s an affordable alternative to real marble flooring, which can be quite expensive. Marbles epoxy flooring can mimic the look of real marble at a fraction of the cost. Finally, marbles epoxy flooring is available in a wide range of colors and patterns, so you can choose the one that best fits your style and design preferences.
How to Install Marble Epoxy Flooring
Installing marbles epoxy flooring is a relatively simple process that can be done by a DIY homeowner. Here’s a step-by-step guide to installing marbles epoxy flooring in your home:
Step 1: Clean and Prepare the Floor
Before you can start installing the marble epoxy flooring, you’ll need to clean and prepare the floor. Remove any existing flooring and sweep the area thoroughly. Make sure the surface is clean and free of debris.
Step 2: Fill Any Cracks or Holes
If there are any cracks or holes in the floor, you’ll need to fill them with a floor patching compound. Use a trowel to spread the compound over the surface of the floor and smooth it out. Let the compound dry according to the manufacturer’s instructions.
Step 3: Apply the Epoxy
Mix the epoxy according to the manufacturer’s instructions. Use a roller to apply the epoxy to the floor in sections. Work in small areas to ensure that the epoxy doesn’t dry before you can add the marbles chips.
Step 4: Add the Marble Chips
Sprinkle the marbles chips over the surface of the wet epoxy. Use a trowel to press the chips into the epoxy and ensure they’re evenly distributed. Continue this process until the entire floor is covered with marble chips.
Step 5: Allow the Epoxy to Dry
Let the epoxy dry and cure according to the manufacturer’s instructions. This can take anywhere from 24 to 48 hours, depending on the temperature and humidity in your home.
Step 6: Sand and Polish the Surface
Once the epoxy has dried, you’ll need to sand and polish the surface to give it a smooth, glossy finish. Use a floor buffer to sand the surface of the floor and remove any rough spots. Then, use a polisher to give the floor a shiny finish.
Step 7: Apply a Sealer
To protect your new marbles epoxy flooring from stains and spills, you should apply a sealer. Apply the sealer according to the manufacturer’s instructions and let it dry completely before walking on the floor.
Maintaining Your Marble Epoxy Flooring
Maintaining your new Marble Epoxy Flooring flooring is relatively easy. Simply sweep the floor regularly to remove dirt and debris. You can also mop the floor with a mild detergent and warm water to keep it clean. Avoid using harsh chemicals or abrasive cleaners, as these can damage the surface of the floor.